How to Make a Magic Ring Left-Handed
Welcome to Sofasaurus Crochet! Today, I’m thrilled to guide you through the essential technique of crafting the magical foundation for countless crochet projects—the Magic Ring. Whether you’re a seasoned crocheter seeking a neater and more secure start to your rounds or a curious beginner ready to unlock the secrets of seamless circles, this step-by-step guide is tailored for all levels. I’ll share my tried-and-true tips and tricks, making the magic ring a delightful addition to your crochet toolkit. So, grab your yarn, your favorite hook, and don’t forget to subscribe to our mailing list for more crochet tutorials and creative inspiration. If you’re interested in a printable, ad-free version of how to crochet double crochet , you can check it out in the shop! Happy crocheting!
Please note
All instructions are in US terms. Please treat the techniques used in this post as recommendations – crochet is an art form and experimentation is the best way to figure out what works best for you! Also, I only recommend products and services that I would use myself and all opinions expressed in this post are my own.
This post may contain affiliate links for which I may receive a small commission at no cost to you.
Tap any image to pin it for later and share it with your friends!
Table of Contents

Sign up for the newsletter!
Materials
Written Instructions
Everything you need to understand what, why, and how!
What is a Magic Ring?
The magic ring is a specific technique used to start crocheting projects in the round, such as amigurumi (stuffed animals) or hats. It creates a tight, adjustable loop without leaving a hole in the center of the work.
How do you make a Magic Ring?
- First, make a loop with the yarn tail around your pointer and middle finger, forming an X underneath.
- With your crochet hook, go under the bottom yarn (the one closer to your palm) and over the top yarn (the one farther from your palm), pulling up a loop. Yarn over and pull through the loop on your hook to make a chain
- Continue to work into the center of the ring until you have your desired number of stitches, then pull the short end to close the ring.
Tips and Tricks
- Make sure you’re comfortable with your tension and are able to work even stitches easily. The first round is going to be the most difficult
- Don’t pull your ring all the way tight once you finish your round 1 stitches- instead, pull it mostly tight, work the second row, and then tighten all the way. This will help keep your center flat and free of bumps!
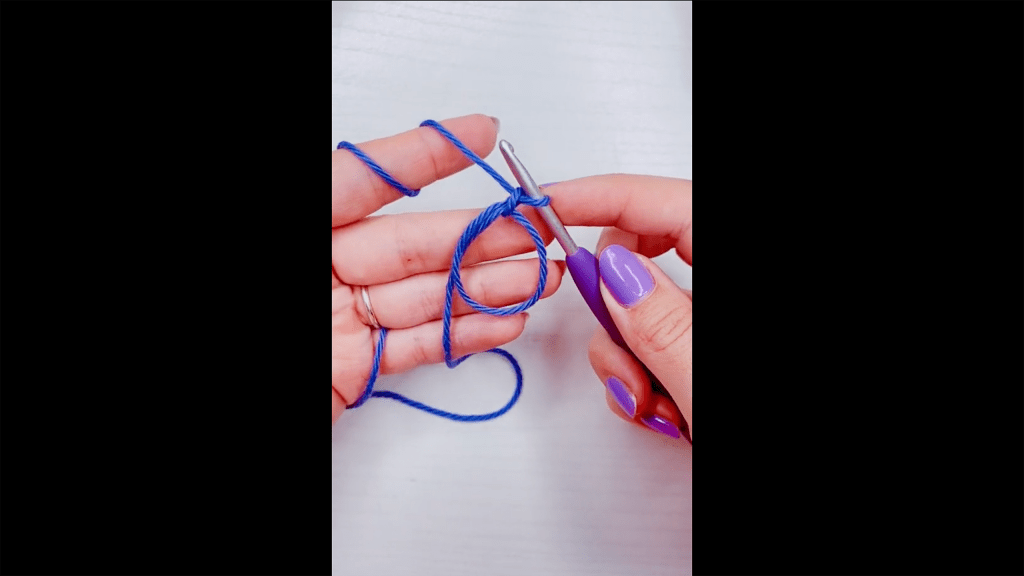
Photo Tutorial
Are you more of a visual person but don’t have the patience to watch a video right now? Take a look at this photo tutorial and don’t forget to save it for later!
Coming Soon!
Illustrated Guide
Are you more of a visual person but don’t have the patience to watch a video right now? Then take a look at this illustrated guide and don’t forget to save it for later!
Coming Soon!
More Video Tutorials
Need more tips? Check out these other related videos!
More Project Ideas and Tutorials
Not sure what to make next? Fortunately, there are TONS of different projects, patterns, and ideas you can gather inspiration from. Check out some of the ones below to get started!

beginner projects 
hats + headbands 
plushies 
seasonal 
appliques 
oh baby
My favorites
Fav patterns + kits + Books
Fav Yarn shops
Filming equipment
Blogging Tools
- Bluehost (Hosting)
- Restored 316 (Theme)
- Adobe Stock (Stock Photos)
- Adobe Creative Cloud (Media Editing)


