How to Crochet Chains
Welcome to Sofasaurus Crochet, I’m Sofia and in this beginner-friendly tutorial, we’ll dive into the art of crocheting chains, an essential skill for just about any crochet project. Whether you’re a seasoned crocheter or just starting your crochet journey, mastering crochet chains is one of the first steps toward creating stunning and intricate designs with ease. Check out our step-by-step video and photo tutorials, and expert tips on how to crochet chains! If you’re interested in a printable, ad-free version of how to crochet chains , you can check it out in the shop!
If you haven’t be sure to check out our tutorial on how to make a slip knot first!
First Time Crocheter? This is the recommended order for anyone learning how to crochet.
Please note
All instructions are in US terms. Please treat the techniques used in this post as recommendations – crochet is an art form and experimentation is the best way to figure out what works best for you! Also, I only recommend products and services that I would use myself and all opinions expressed in this post are my own.
This post may contain affiliate links for which I may receive a small commission at no cost to you.
Tap any image to pin it for later and share it with your friends!

Table of Contents

Sign up for the newsletter!
Materials
Written Instructions
Everything you need to understand what, why, and how!
What is a Crochet chain?
A crochet chain is a type of crochet stitch that is used to create a foundation for other stitches. They are made by wrapping the yarn around the crochet hook and then pulling it through the loop on the hook. The number of chains that are made will determine the size of the fabric that is being crocheted.
Crochet chains are used for a variety of purposes- they can be used to create the foundation of a row of stitches, to add height to a project, or to create spaces between motifs. Chains can also be used to create decorative elements, such as borders or edging
How do You crochet a chain?
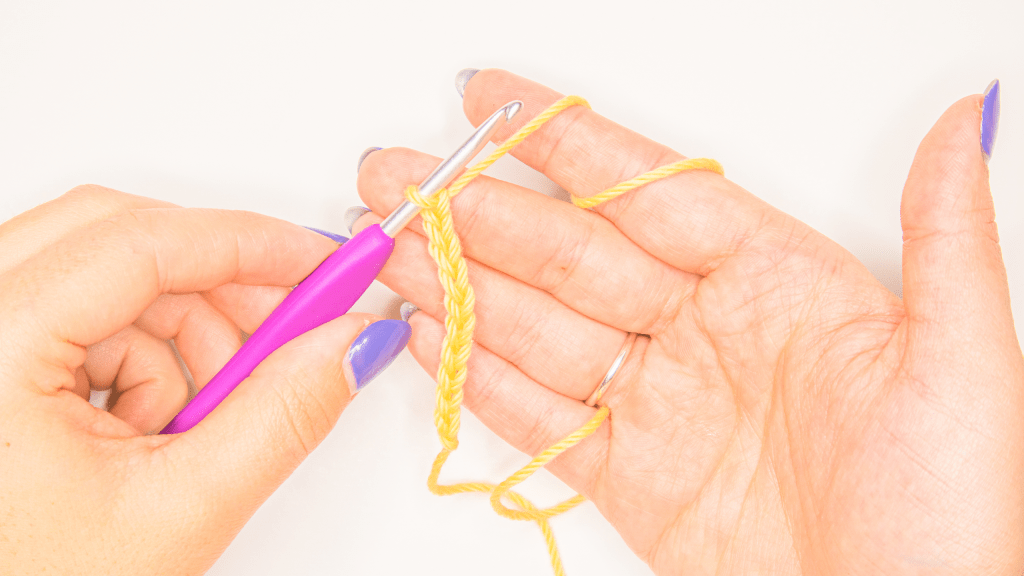
- To make a chain, start with a slip knot on the hook. You want to make sure that the loop on the hook is big enough to glide up and down the hook without getting stuck.
- When you look at the loop on your hook, it’ll be an upside-down teardrop shape. You want the tip of your hook to point toward the tip of the teardrop so it can glide through without getting caught on anything. Before you wrap the hook around the yarn, ensure that the tip of your hook is facing you.
- Then wrap the yarn around the hook (yarn over) by bringing the yarn down in front of the working yarn and back up behind it.
- Next, rotate your wrist to turn the hook face down- this will help the yarn get “caught” by the hook.
- Continue to guide the yarn through the loop on the hook. For extra control, hold on to the slip knot with your left middle finger and thumb and push the hook up just a little to enhance the upside-down teardrop.
Here are some tips for making chains:
- Keep your yarn loose and don’t pull on it. Tight chains are incredibly difficult to work with. If you’re having a hard time doing that manually, go up a hook size or two (you can even practice with a bigger yarn if you find it to be too flimsy between your fingers)
- Keep tension on the hook by holding on to each new chain with your middle finger and thumb. In other words, travel up with the hook. Chains usually get tighter the more you feel out of control, and guiding your work can help you feel more in control.
- Practice until you get an even “whipping” motion. Crochet is at least 75% muscle memory. Your hook will be doing the following motion for most stitches: push forward -> rotate down -> pull back. I always recommend chaining for at least 30 minutes the first time and practicing daily for 10 minutes over the weekend.
- Relax. Keep your shoulders away from your ears, release your tongue from the roof of your mouth, and don’t rest your elbows on anything (forearms are ok to lean against a table, but you need to be able to move those elbows)
Animation
Hopefully, this animation can help you understand the concepts a little better!
Photo Tutorial
Are you more of a visual person but don’t have the patience to watch a video right now? Take a look at this photo tutorial and don’t forget to save it for later!
Coming Soon!
Illustrated Guide
Are you more of a visual person but don’t have the patience to watch a video right now? Then take a look at this illustrated guide and don’t forget to save it for later!
Coming Soon!
Crochet Chart Symbols
Crochet Charts are a great way to avoid common language barriers and clarify difficult crochet patterns. These symbols are used to help you visualize where stitches go and how they align with one another. Don’t forget to add this image to your crochet toolbox!

Frequently Asked Questions
Below you’ll find a collection of common issues and troubleshooting tips! If you’d like to add your own question, just leave a comment on this post!
If you’re struggling with feeding the hook through the loop, there are a couple of things you can try to keep your loops larger
- You can grab each chain as you finish it, i.e. travel up the chain. This helps keep the chain from getting pulled tight when you wrap it back around the hook for the next chain.
- You can also make sure to push the loop back onto the body of the hook after each chain. This will create a “whipping” motion that’ll help your muscles remember the movement in the future.
- Or you could go up a hook size. Although it might seem counter-intuitive (because the head of the hook will get bigger), it’s the body of the hook that determines the size of the loops. Therefore, a larger body will also create larger loops!
- Finally, make sure you don’t choke out your hook – this happens when you let the loop on the hook travel up toward the head. Again, keep it on the body of the hook for even chain stitches.
The “yarn over” is used for every stitch in crochet and creates a signature “V” shape within the stitch itself. The “yarn under” is only an option for the single crochet and creates an “X” shape.
Tension describes the evenness and size of stitches in relation to others. The only way to truly improve tension is with practice – over time your hands will develop the muscle memory required to achieve “even tension.”
Tension can also references the size of the stitch. The theory is that you can “control your tension” to create smaller or larger stitches to achieve a different effect. I don’t recommend this practice. Just go up or down a hook size – if your stitches are all even in size you do not have to “adjust your tension” to match a pattern.
The best way is through practice, but I do have a few tricks that have helped my students in the past
– First, make sure the loop is always either as big or only slightly bigger than the body of the hook. Take care not to choke your hook. You should never struggle with pulling the yarn through the loop on your hook because it’s too small.
– At a minimum, hold the yarn by either wrapping it around your left index or middle finger. I wrap mine around the pinky for extra control, but keeping your hand from flailing around like crazy helps SO MUCH
– You can also use your left middle finger and thumb to control the bottom of your stitches. This will be especially useful when working with puff stitches.
A really good beginner project is anything square or rectangular: coasters, scarves, pot holders, dish towels, table runners, blankets, etc.
More Video Tutorials
Need more tips? Check out these other related videos!
More Project Ideas and Tutorials
Not sure what to make next? Fortunately, there are TONS of different projects, patterns, and ideas you can gather inspiration from. Check out some of our ideas!

beginner projects 
hats + headbands 
plushies 
seasonal 
appliques 
oh baby
Some of my favs
Fav patterns + kits + Books
Fav Yarn shops
Filming equipment
Blogging Tools
- Bluehost (Hosting)
- Restored 316 (Theme)
- Adobe Stock (Stock Photos)
- Adobe Creative Cloud (Media Editing)


